How to Install a SpaLet Bidet Toilet
OUTLINE:
IntroRequirements for Installation
Tools
Process
DIFFICULTY: Moderate to Difficult
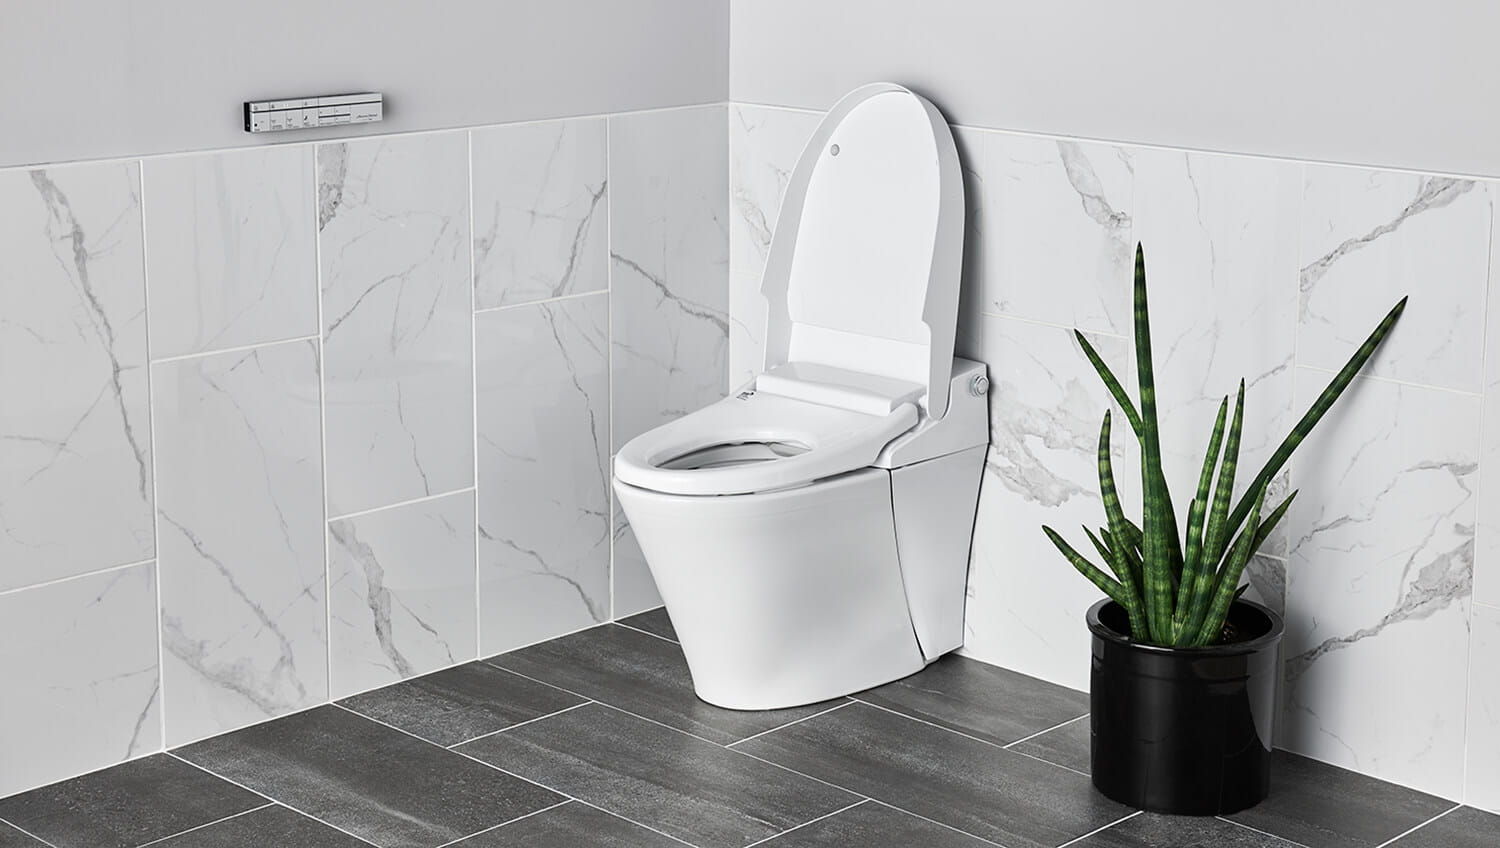
The Advanced Clean 100 SpaLet Bidet Toilet features thoughtful technology and comfort, with a modern, sleek design that looks great in any bathroom. For the handy homeowner, the SpaLet Toilet can be installed - but professional installation is recommended especially if this is your first toilet installation. The installation is similar to a regular toilet but uses a drain socket and a gasket different from a traditional wax ring. We have designed this for an easier installation but it depends on your technical expertise and comfort level.
Requirements for Bidet Toilet Installation:
Before you begin, it’s recommended that you review the following requirements for installation of your new SpaLet Bidet Toilet.
Minimum Installation Clearance:
For the required minimum installation clearance, refer to the figure below.
A space of 70 mm (2-3/4") or more on each side of the product is recommended. If it is less than 70 mm (2-3/4"), it may hinder the operation.
Place the water shutoff valve to 2" (50 mm) from the wall.
What type of power is needed?
AC120V GFCI outlet. The seat consumes maximum 1300W.
What type of water pressure is needed?
Minimum water pressure: 0.1 MPa (1.0 bar): 14.5 psi Flow pressure.
Maximum water pressure: 0.75 MPa (7.5 bar): 109 psi Hydrostatic pressure.
Tools for Bidet Toilet Installation
Items needed for the bidet toilet installation include:
Standard household tools
Drill and Bits
Caulking
Tape
Notes Prior to Installation
Do not hold the hose at the rear of the SpaLet toilet bowl.
If the hose is removed, then this may cause leaks, and the SpaLet Bidet toilet will not flush properly.
Installing the Toilet Bowl
Step-by-Step Bidet Toilet Bowl Installation Guide
STEP 1: Drain Water Layout and Positioning
Position the water supply pipe and drain pipe.
If the water supply is on the right, position the water supply pipe reversed to the other side of the line of the drain pipe position.
For a water supply on the right use the 322-1149-65 (optional hose) water supply hose available, sold separately.
Notes: Ensure the water supply hose position matches the dimensions in the diagram.
Before mounting the SpaLet bowl, ensure that the water supply pipe is sealed using a plug, and that the drain pipe is covered with plastic or similar.
Fasten the water supply pipe tightly so that there is no looseness.
STEP 2: Positioning and Mounting the Socket
Temporarily connect the drain socket to the closet flange with T-Bolts and “without” a wax ring
Mark the rear locations of the socket mounts where 2 pilot holes are to be drilled then remove drain socket from flange.
Drill 2 pilot holes 5/16"- 8mm diameter x 2 3/16"-55mm deep. Clean out the debris from the pilot holes. Insert the floor anchors into the pilot holes.
Mount wax ring to the drain outlet of the drain socket.
Place drain socket over the closet flange and T-bolts. Tighten closet nuts to secure socket to closet flange and floor. Place the 2 mounting screws into the rear mounting holes and tighten.
Notes: When connecting the drain socket to the closet flange, align the center of the drain socket with the center of the drain outlet and T-bolts. If the drain socket is not centered, then this may lead to blockage.
Ensure that the drain socket is connected parallel to the rear wall. If this is skewed, then the SpaLet bowl will be attached at an angle.
STEP 3: Positioning and Mounting the SpaLet Toilet Bowl Mounting Wood Screws and Front Securing Member
Align and position the Installation paper guide to the rear edge of the socket. Make pilot holes and fit the Floor Anchors.
Remove the installation paper guide, and affix the Front Securing Member with the washers and mounting wood screws.
Affix the SpaLet bowl mounting wood screws.
Notes: Ensure that there are no shavings or other debris on the Front Securing Member. Carefully remove any if present as this may cause faulty fixing.
STEP 4: Mounting the SpaLet Bowl
Place the mounting adhesive on top of the Front Securing Member with the contoured surface facing down as shown in the image.
Ensure that the mounting adhesive is placed in the center of the Front Securing Member.
Prevent moisture or impurities from getting on the mounting adhesive.
Note: At low temperatures, the mounting adhesive may become hard, so warm and soften it.
When using warm water, put the mounting adhesive in a plastic bag.
Affix the water shutoff valve water supply inlet in such a way that the water supply hose is not crimped.
Wall water supply – Mount the water supply inlet at approx. 10 degrees downward relative to the horizontal level.
Floor water supply – Mount the water supply inlet at approx. 10-degrees tilted to the wall.
Attach the clip firmly.
Seat the clip firmly until it makes an audible click.
Install the clip horizontally to the side of the SpaLet Body.
STEP 5: Connecting the Water Supply Hose (Water Shutoff Valve End)
Note: Be careful not to impact the power plug, or let it fall into the SpaLet bowl.
Install the water supply hose to the water supply inlet.
Remove the protective cap.
Connect the water supply hose.
Note: Ensure that the water supply hose is not bent tightly or stretched. Do not use a hose that has been bent.
* The hose may be damaged resulting in water leakage.
* This may result in incomplete cleaning.
* Affix the clip in the same way as with the seat unit water supply inlet.
After affixing, rotate the clip, and check that it is attached properly.
Also, pull the water supply hose gently to ensure that it is connected properly.
STEP 6: Connecting to the Power Supply
WARNING: Ensure the electrical outlet to which the power cord is connected is properly grounded, as failure to do so may cause electric shock, etc.
Connect the power plug to the outlet.
Check that the power is on.
Confirm that the power indicator on the seat unit is illuminated.
STEP 7: Positioning and Mounting the Remote Control
Install the remote control to a position where the user can reach and operate it. Sit on the Spalet seat and ensure the installation position.
Installing the Batteries and Confirming the Remote Control Installation Position
Open the back cover of the remote control, and install the included batteries (AAA x 2).
Mounting the Remote Control
Remove the holder from the remote control.
Install the holder to the installation position using an appropriate method for the wall.
Use a tool such as a flat-blade screwdriver to push the hook (lock) to remove the cover.
Confirm the remote control installation position.
Out of 4 slots, use the outer 2 slots (with A marks). If the holder can be installed only with a hole pitch at 100 mm (3-15/16"), use the inner 2 slots.
For Plywood Wall or Plasterboard Wall
Make the pilot holes with 6 mm (1/4") diameter. (5 mm [3/16"] diameter for a plaster board wall)
Use a hammer to insert the supplied plastic anchors gently.
Affix the holder firmly with the wood screws.
For Concrete Wall
Make the pilot holes with 6 mm (1/4") diameter and approx. 33 mm (1-5/16") depth.
Use a hammer to insert the supplied plastic anchors gently.
Affix the holder firmly with the wood screws.
Align the remote control to the holder, and push downward to mount the remote control.
Press the [Hr] and [Min] buttons to set the current time.
*Pay attention to AM and PM.
STEP 8: Test Operation
Follow the steps below to test your new SpaLet Bidet Toilet once installation is complete.
Is there any water leakage?
Open the water shutoff valve.
Flush the SpaLet bidet toilet several times.
Check between the water shutoff valve and the water supply hose.
Check between the toilet and the water supply hose.
Check between the toilet and the SpaLet Bowl
Check between the bowl and the floor
Do the rear washing and front washing operate properly?
Connect the power plug to the outlet.
Roll up a sleeve and place your arm so that the palm of your hand is over the center of the SpaLet bowl.
Rear Washing Nozzle
Does the warm water with an appropriate temperature come out from the nozzle?
Press the CLEANSING button.
Ensure that the shower comes out from the nozzle to the palm.
Does the shower stop when the STOP button is pressed?
Does the shower stop when the STOP button is pressed?
Bidet nozzle
Does the warm water with an appropriate temperature come out from the nozzle?
Press the BIDET button
Ensure that the shower comes out from the nozzle to the palm.
Remove the arm from the SpaLet bowl.
STEP 9: Mounting the Side Cover
Attach the side covers on both sides.
Insert the ‘clip’ on the upper side of the side cover into the ‘clip holder’ on the SpaLet Bowl
Align the lines of the SpaLet bowl and the side cover, and attach the side cover to the “Velcro fastener” on the lower side of the SpaLet bowl.
Push the center of the side cover to secure the “Velcro fastener” firmly.
Check out our other Bidet related articles!

 Setting the standard
Create An Account
*Required Fields
 ELEGANCE ENGINEERED TO ENDURE
RESET YOUR PASSWORD
ELEGANCE ENGINEERED TO ENDURE